Tag: Weatherboard victorian

  • How to Paint Your Weatherboard House

    How to Paint Your Weatherboard House

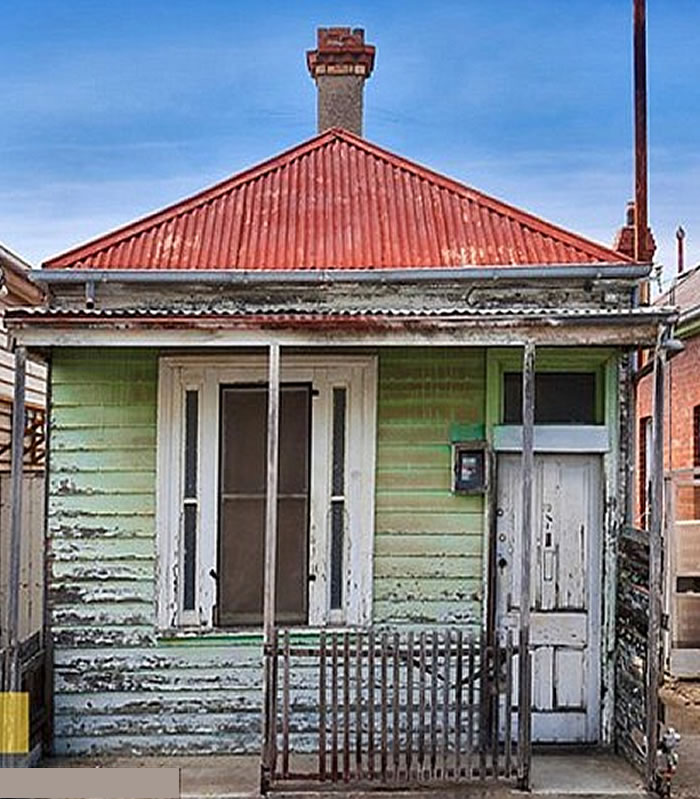
    How to Paint a Weatherboard House. Kensington

    Why would we tell you how to paint your weatherboard house? Surely I’m just about to give the game away! Tell you all the secrets. Make myself redundant.

    It’s relatively easy to do, all you need to do is prepare and paint afterall! I’m just about to list every step for you, so it’s even easier now. All you’re lacking now is number one, experience, fine you’re going to take longer but that’s okay, and number two, time.

    Time. It’s the crucial thing. Time. Painting a weatherboard house takes time, a lot of time, far more time than you think.

    An average single fronted would take 160 hours of prepartion and painting for an experienced exterior painter. If you’re great at DIY, then just add 50% more time to that.

    So knowing that it’s going to take you at least 240 hours, 15 weekends to paint your house, I’m safe to let slide a few secrets. Yes, I’m having a latte and avocado smash whilst you’re painting this weekend….  ….and the next!

    Weatherboard House Painting Check List

    Before you start to paint the exterior of your house, there are a few other things to check.

    Do you need to repair anything first?

    Rotten weatherboards, windows, doors? Are other things causing problems, guttering that’s leaking?

    Fixing a few simple things first:

    Rusted metal gates/window parts/nail heads, sand first and then paint with metal primers.

    Bleeding knots in the weatherboards, should be primed first.

    Nails that need to be reset. Use a nail punch, sand prime and fill over.

    Removing Old Paint:

    If it’s flaking – get rid of it! Scrape off flaking paint.

    Sand all the surfaces to a flat finish, that’s all the weatherboards! Sanding is very important not just in getting to a better surface but to promote better adhesion between the layers. Your paint job will last much longer if you sand everything.

    Prime all bare wood

    New weatherboards:

    Most weatherboards now come preprimed. This is a transit primer designed to keep the boards in good condition in storage and transit and should not be confused with normal primer. All weatherboards must be primed prior to painting.

    Exterior Painting Preparation

    Don’t paint around door numbers, light fixtures (be sure to turn the power supply off), screens, door handles – remove them! It’s easier, will save you time and looks much better.

    Fill holes with an exterior filler, two pack filler for high traffic areas.

    Gap under weatherboards, this stops rain and moisture going up the back of the weatherboard. There are gap sealents designed for weatherboards, these have a much bigger stretch, so when your weatherboards move with the weather the gap won’t split.

    Painting Weatherboards:

    The easiest way to paint weatherboards is by brush. A good 88mm or 100mm brush is ideal.

    Try to follow the sun around the house, as this dries any dew and means you won’t be working in the sun.

    Start by painting the boards in a horizontal section, then more the ladder to the adjoining section untill you have painting the entire length of the wall. Lower the ladder and repeat the process until the wall is complete.

    Remember to keep a wet edge.

    Remember ladder proceedures. Always make sure your ladder is set up properly, extention hooks are securely in place, make sure of it’s footing, it should never lean to one side. It’s not too upright. You should never reach too far when painting, you should always have three points of contact to the ladder (use a s hook to attach paint can to the ladder), your free hand is for painting, look out for power lines, never step on the top three runs of a ladder. Check these everytime you move the ladder.

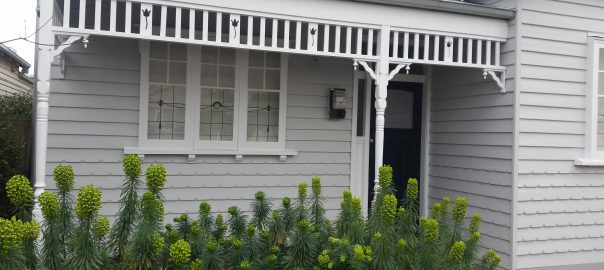
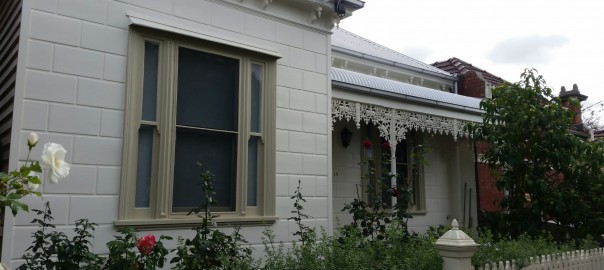
    Painting Exterior Trim:

    Paint windows, sashes, sills in the same order as the interior ones, working out from the sashes to the frames. Window sills bear the brunt of the weather and accumulated dirt. Give them an extra two or even three coats of paint, remember the underside.

    Painting an exterior door, in the same order as interior doors, the panels first, then the middle vertical bar, the stiles, and finally the edges, working from top to bottom.

    Always try to paint the top and bottom edge of the door, this will keep out moisture and stop rotting.

    Railings and metal fence, use a lamb’s wool mitten applicator instead. The mitten applicator, allows you to grasp the railing, smearing on the paint as you move your hand up and down. Touch up with a brush. This may take three coats.

    Wooden picket fences, use a small roller (100mm) with a long handle, touch up with a brush, again this may take three coats.

    Good Luck with painting your weatherboard house!

  • Is It Time To Paint? Your Weatherboard Painters

    Is It Time To Paint? Your Weatherboard Painters

    Bespoke Artisan Weatherboard Exterior Painters. Brunswick

    If you think it’s time to paint your weatherboard, then your friends have thought it for a long time! Time to hire your weatherboard painters.

    Now that the BBQ season is just about over, it’s time to get your home painted, and ready for next year.  We know it’s a social whirl, and impressions count. Has your weatherboard been letting you down? Does it show you up? Is it still in last years colours?

    Shabby chic is not ‘in’ anymore, it’s not the 90’s. Peeling, blistering paint isn’t cool. We know it. Design magazines know it. Your friends know it, and they’ve been talking behind your back about your dated weatherboard house.

    Traditional Master Painters

    We at Sterling Painters only apply the world famous boutique Dulux Weathershield on weatherboards. Using time honoured techniques handed down generation to generation, father to son, such as sanding and painting. We’ll use buzzwords like small batch, fluid, stone ground and hand finished. We’ll even grow beards and stroke them whilst admiring our handywork.

    Soon, you’ll be the envy of your friends. They’ll still talk behind your back, obviouly, but you can be safe in the knowledge that it’s just jealously.

    Pinterest Sterling Painters Exterior Ideas

  • Before and After The Victorian Weatherboard Painters

    Before and After The Victorian Weatherboard Painters

    Victorian Weatherboard Painters Seddon

    Victorian Weatherboard houses always provide satisfaction. Taking run down old houses and turning them into gems, is one of the reasons we work as a Victorian Weatherboard painters.

    “This one’s a work in progress, hence we should have it 99% done by the end of the week.”

    Weatherboard houses are full of character, some of that character is in the lovely little details. However most of that character is usually called maintenance.

    Typically a weatherboard house should be painted every 10-15 years, but I’ve seen paint jobs only last a couple of years almost always as a result of a poor job. Due usually to little or no preperation, unprimed boards and, or a poor product was used as a top coat.

    We sand, then sand again, between coats and then just because. All new boards are primed, that pink or white stuff the boards are sprayed in is a ‘transit primer’, and not a real primer. As a result our paint job will last. We gap, we fill, we sand. Then we paint, and finally sand and paint.

    Paints Used:

    • Dulux WeatherShield Low Sheen: Tranquil Retreat
    • Lexicon Gloss for Trim
    • WeatherShield Gloss: Maximus
    • WeatherShield Low Sheen: Flooded Gum

    Our wonderful Colour Consultant was employed on this project, and as a result, the house looks great and as for the streetscape, no one can argue with that. See how she can transform your home and your lifestyle. We are your Victorian Weatherboard Painters Seddon.

    Pinterest Exterior Sterling Painters Ideas

  • Face Painting Weatherboard Homes in Winter? We Do

    Face Painting Weatherboard Homes in Winter? We Do

    Painting Weatherboard Homes in Winter – Kensington

    We always get asked to paint weatherboard houses, but especially in winter. Why? You may ask. I assume that come Autumn, everyone’s house looks a little dull. So I guess we’ll be painting weatherboard homes in winter again!

    The same people also think that winter would be too cold/rainy etc to paint outside. Whilst us painters aren’t exactly happy with the colder, wetter weather. The paint dries slower, and that’s better than drying too fast a hot day in summer, and as a result, makes for a better finish. Less brush marks, less joins. Wet edges keep wet for much longer, no need to use acrylic paint conditioners, and less washing brushes at the end of the day, as the brush isn’t caked with paint.

    So even on a rainy day in June, under the veranda, there will be us exterior house painters, looking a little sad, sanding and painting away. No we aren’t cold, as painting is a active pursuit, but we’ll be checking the forecasts, the rain radar throughout the day. Still looking a little sad!

    Paints Used:

    • Weatherboards: Dulux Weathershield Semi Gloss – Lime White Gloss
    • Trim: Dulux Weathershield Gloss – Triple strength Ecru
    • Front Door: Heritage Paints Gloss. Sorry the colour has Slipped my Mind!

    Sterling Painters Pinterest Exterior Ideas